Letter Formation
On this page, I'll describe principles and difficulties of cursive letter formation, focusing especially on lowercase cursive. I'll also link to resources that help to visualize letter formation.
Letter formation is the ability to create correct, recognizable letters. Two important parts of letter formation are:
- the route of the letter: which strokes to make, and especially: in which order to make them, in which direction to make them, and knowing when and where strokes need to overlap each other.
- the size of the letter, or more specifically, the size of the strokes. Where do the strokes begin and end relative to the lines (baseline, waist line, top line) on the paper.
Topics on this page:
Resources for visualizing letter formation
Outline letters with route information
This online app allows you to create outline versions for all lowercase Cogncur letters. There are also various color-coded arrows, dots and dashed paths that you can add to the outline letters to visualize correct letter formation.

click to create outline letters
Step-by-step images
...coming soon...
Letter animations
This web page shows a simple animation of how the letter should be written.

click to view letter animations
Principles of lowercase cursive letter formation
Start from the baseline?
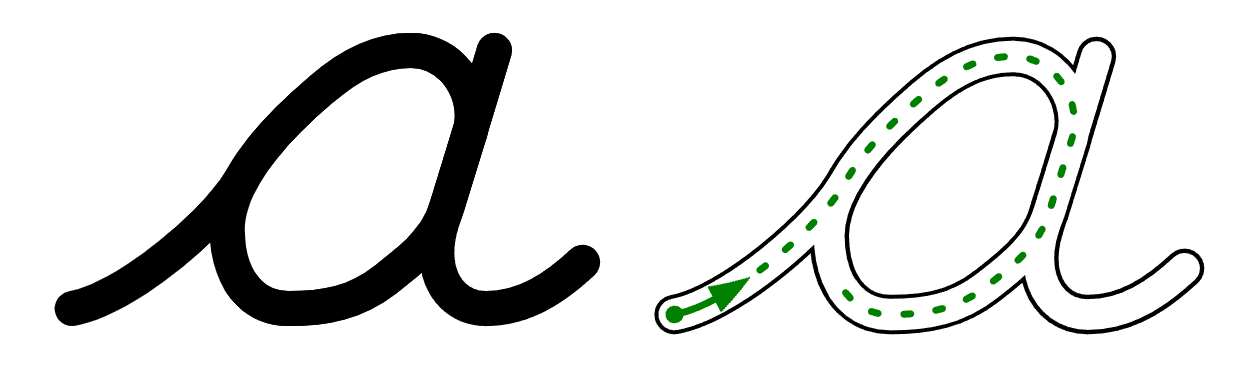
Many cursive fonts used in education start all lowercase letters from the baseline. For most letters, this simplifies letter formation and helps young learners. For the letters a, c, d, g, o and q, starting from the baseline adds an extra stroke to the letter. This extra stroke introduces some extra difficulty when first learning the letter in isolation, but this difficulty can be considered desirable. If no entry stroke from the baseline is used, students will have more difficulty learning to join the letters together.
Letter a with entry stroke from the baseline
Letter a without entry stroke from the baseline
Don't lift your pen
When writing lowercase cursive, you don't lift your pen, except to write the dots on i and j, the cross bar on t and the diagonal stroke of x. As a consequence of not lifting your pen, you'll need to trace back over your previous stroke sometimes. When trying to visualize this in a single image, we can use overlapping colors to show the different strokes:
Letter m with overlapping strokes
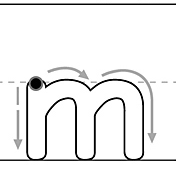
Another option is to stack the strokes on top of each other. This will work well if we use multiple "step-by-step" images to depict letter formation. However, when combining all the information into one image, the extent of the overlap is no longer clear:
Step-by-step images for constructing the letter m can stack the strokes on top of each other.
How much overlap between strokes?
Strokes can intersect
In cursive, strokes can intersect. One reason for this is our desire to join letters: (for example, the intersection "in" the letter e actually involves the entry stroke or join towards e). The other reason for this is to prevent long overlapping strokes. The 'short' legs of n and u require the pen to reverse and backtrack over a previous stroke, but since these sticks are very much necessary to recognize the letters, these legs must remain straight. However, because very few letters have parts 'sticking out' above the waist zone, ascending sticks can be safely changed into loops without making the letters hard to distinguish from each other, and doing so avoids a long stretch of overlap between strokes: l becomes l, h becomes h.
Below the baseline, there is more diversity in print, because some letters have straight descending sticks (p and q), while others have sticks with curvy ends (like j and g). j and g receive loops in cursive in order to be able to join them to the next letter, but as for p and q, every font designer seems to have their own opinion on whether loops on these letters are desirable or confusing.
Learners must must recognize an intersection for what it is - an intersection - in order to know that they should be going straight through it. The next principle - no straight or obtuse angles - 'forbids' us from taking 'wrong turns' at intersections, but is not really suitable for explaining to young learners.
No straight or obtuse angles
This is probably too complicated to explain to young learners, but it can help yourself to understand why the cursive letters are shaped the way they are, and how letter shape is dependent on letter route.
Cursive is only a few centuries old, whereas the capital letters used in print date back all the way to Roman times. Cursive is derived from print. And one of the ways in which print was adapted into cursive, was by changing getting rid of all the straight and obtuse angles. Most of them were changed into curves. You can see this change in both lowercase and uppercase E: e => e and E => E. Curves are much faster to write then angles. When an angle needed to be preserved to keep the letter recognizable, the angle was often made more acute than it was in the print version of the letter, and sometimes angles were even changed into full reversals. The "waves" in the top and bottom part of the letter Z are examples of this: they result in more acute angles than are present in print version Z.
The end result is that in, the route that the pen follows never contains a straight or obtuse angle. Any straight or obtuse angles you see are the result of different strokes meeting each other (like in P ) or intersecting each other (like in t).
Some Dutch curricula join to the letter t with a straight connection to the waist line. The only way to reliably achieve this shape, is by lifting the pencil. If the pencil is not lifted, then it is only natural that the writer will change the straight join into a curved one.
To achieve the acute angle in this letter t, you must lift the pen (twice).
If you don't lift your pen, you'll tend to curve your connector, resulting in this shape.
Problems with cursive letter formation
Intersecting strokes
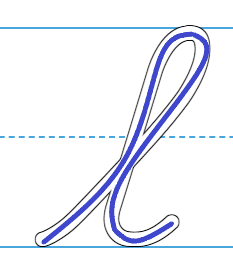
Very young children do not understand how strokes intersect. When one of my sons was 5 years old, he traced the letter l like this:
How my 5-year-old traced the letter l.
If a child has difficulty with letters that intersect, they will have even more difficulty with letters where the pen needs to reverse and backtrack. The order in which letters are taught to this child will be important.
One ways to show the correct route through intersections is by using a dashed stroke. A dashed stroke shows the direction of the stroke though the intersection, in a way that a dotted stroke or a continuous strokes does not.
A dashed stroke can show the direction through intersections.
Pencil lifts
Children must be taught not to lift their pen unless absolutely necessary, and must learn that the way to achieve this is to reverse and backtrack over previous strokes. This is not just the case for cursive, but also for lowercase manuscript writing. There are all kinds of reasons why children lift their pens, and unfortunately, poorly chosen visualizations and activities can contribute to this.
A common visualization of letter formation is using arrows added outside the letter. These arrows can be pretty vague, especially when the letter itself is rather thick. It's not always clear where the stroke depicted by the arrow is supposed to 'start'. But even worse than vague, sometimes there arrows are just plain wrong:
It's not clear what the arrows are trying to depict,
but it looks like the second and third stroke
start somewhere from the 'top' of the letter...
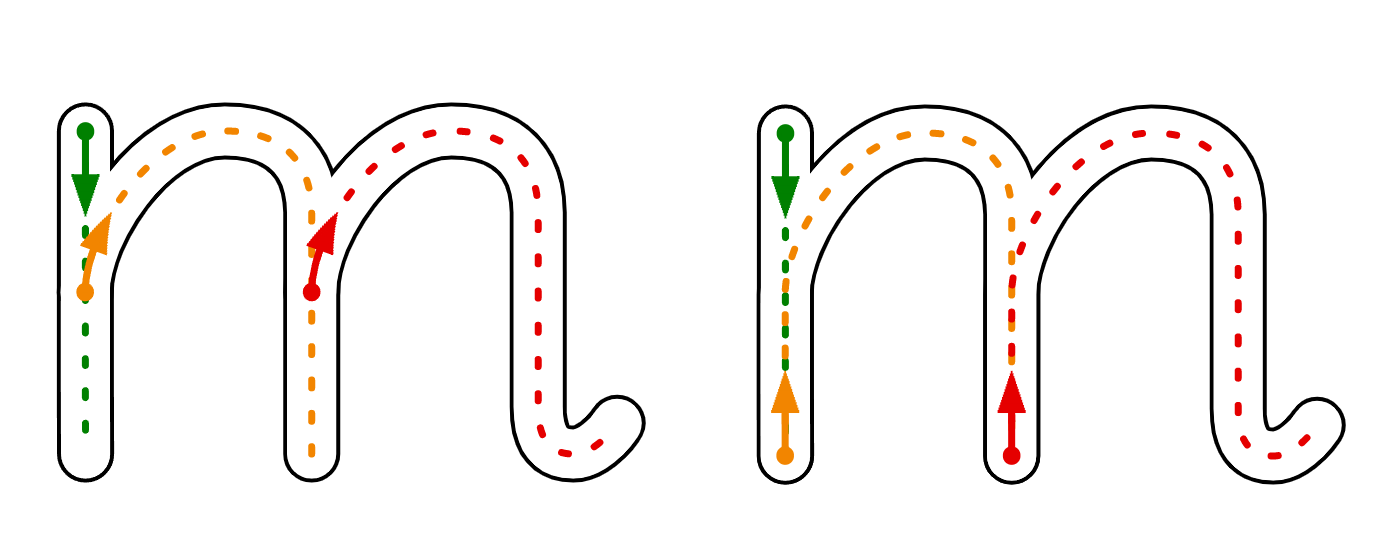
These arrows are unambigious. The first version cleary shows an incorrect
pencil lift. The second versions shows strokes initiated from the bottom
of the legs that overlap previous strokes.
In the correct, unambigious version, overlap is shown in two ways. First, the arrows inside the letters show exactly where each stroke should start. When students lift the pencil, they usually skip the start of a new stroke, not the end of an stroke-in-progress, so showing the correct starting positions for each stroke will help with correct letter formation. Second, by using a different color for each stroke, the overlap between strokes is also shown directly. However, this signal will be lost if the image is printed in black-and-white.
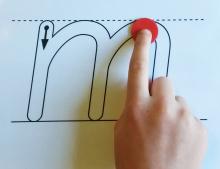
Some tracing activities encourage pencil lifts while others discourage pencil lifts. Can you see which does which?
Tracing a letter with a toy car.
Tracing a letter with a coin.
A car is a poor metaphor for a pen. A car can only move in the direction that it's pointing towards. When a learner is tracing a letter with a toy car, they will be continuously changing the direction of the car. When the learner reaches a point where the pen should reverse, they are likely to lift up the car and put it back down again pointing in the 'correct' direction. And if a learner is picking up the car anyway, they may also put it down somewhere else, thereby skipping part of a stroke. One strong point about the 'toy car' material depicted is the use of a dashed stroke in the middle of the letter; it shows how the curved counter 'merges into' the vertical stroke.
A coin is a better metaphor for a pen. It can be moved in any direction without first having to turn towards that direction, just like a pen. Because it is flat, it is pretty awkward to pick it up, so learners are strongly discouraged from picking it up, and encouraged to trace back over their previous stroke instead. [On the other hand, if you're teaching a script where pencil lifts are desirable and necessary - like print capitals - a coin is a poor metaphor because it's much harder to pick up than a pen.]
A failure to reverse
Not all reversal points are equally difficult. The easiest to understand at reversals that occur at the end of a stroke, without touching any other stroke. This happens in the letters n, m, u but also c. So long as the students understands they that they should not lift the pencil, they have no choice but to go back. Harder are reversals that occur 'perpendicular' to another stroke of the same letter, such as happens in the letter d and k. Still harder is when two reversals points overlap, such as happens in the letters a and g. Hardest of all is when two reversal points overlap but the two strokes appear to be possible extensions of each other. In the Cogncur font, this happens only in the letter o.
A reversal point that doesn't
touch any other strokes
A reversal that is perpendicular
to another stroke
Overlapping reversals points,
perpendicular
Overlapping reversals points; the
strokes are possible extensions
of each other
In the case of the letter o, there is a high chance that the child will fail to reverse and attempt to construct the letter clockwise instead of counterclockwise. If the reversal point for the letters a, d, g and q are placed below the waist line instead of on the waist line, a clockwise construction for those letters also becomes more likely.
If the reversal point for a is placed below the waist
line, children may attempt a clockwise construction.
The most important techniques to prevent problems with these reversal points are good demonstration, supervised practice, feedback, and teaching the letters in a sensible order. However, the following visualization techniques above can help, especially to inform parents when sending homework home:
- Use a different color for each stroke, to show the areas where two strokes overlap.
- Always use the same sequence of colors, and make that sequence explicit to learners. When 'reading' the image of the letter a above, the learner needs to know that after the green stroke, they should follow the yellow one, not the red one.
- Don't use dots or circles to show reversal points, because one of them will become invisible when you overlap them. Don't 'solve' this by moving your dots around, because then you're obscuring the correct location of the reversal points. Instead, attach arrows to your dots. This way, you draw attention to the fact that two reversal points overlap.
If you can not use color, them step-by-step images are needed:
A black-and-white explanation of the letter o is best done using multiple, step-by-step images.
Also, please, teach these letters with an entry stroke from the baseline. It's much better to teach these reversals from the start, when students are only focusing on one letter at a time, then to confront them with the need to reverse when they start joining letters to each other.
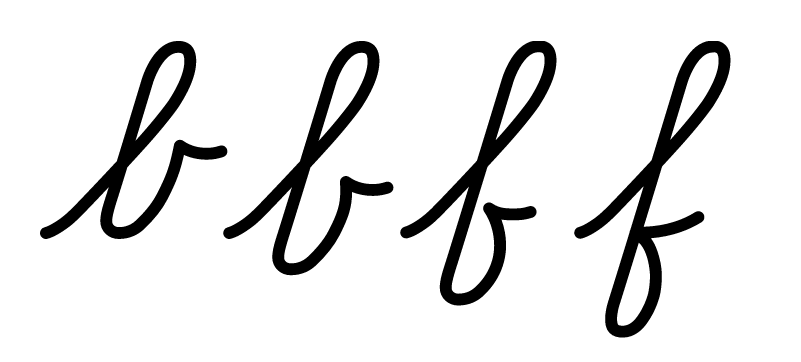
A lack of attention to size
The letters b and f use the same sequence of strokes,
but are distinguished by the size of their strokes.
It's not enough for children to learn the order and direction of the strokes in a letter. They also need to know the size of these strokes. Only if both the route and the size are correct do we get recognizable letters. You'd think we don't need to do anything special to visualize size, because whenever we show a letter, we're already showing them the size? But actually, to direct students' attention to size, we need to use lined paper. Use lined paper from the very beginning, the first time we show them a letter or ask them to trace a letter.
This article re-uses images and ideas from an article that I previously wrote on my website with commercial fonts.